Tuesday, December 20, 2011

To paint or not to paint?

So we are thinking about painting the kitchen cabinets because we aren't a huge fan of them, so we think sprucing them up with some color might help. We are already planning on taking down the cabinets above the island and replacing them with some open shelving, so they will work perfectly for testing out colors.
Before

So we headed over to Home Depot, and looked at paint colors and choose 3 colors we thought we might like, and got samples at $3 each. We already had some paint rollers left over from the chalkboard painting project, and the previous home owners left primer in the garage, so we didn't have to buy any other supplies.
From left to right, the colors are Martha Stewart's Winter's Day, Martha Stewart's Glass of Milk, and Behr's Spartan Stone.  Still undecided at this point, I think Glass of Milk will look nice with the black hardware options, but might look too white against our walls, which are also white. So I'm leaning between the Winter's Day and Spartan Stone. 
 Winter's Day
 Glass of Milk
 Spartan Stone
I think we are both leaning towards spartan stone with the beaded curved black hardware, what do you think?


Friday, December 16, 2011

Brinkmann Smoker


America
Nutmeg loves smokers

Since my freshman year at Georgia Tech I have been interested in the awesomeness that is good southern BBQ. Growing up in Rochester, NY there was only 2 good BBQ joints, Sticky Lips and Dinosaur BBQ.  The abundance of truly great BBQ I encountered south of the Mason Dixon line blew my mind. I could not get enough of the numerous styles and sauces that each region had to offer. Being a northern boy I was always content with a hot grill and a few white or red hots cooking away. I had no idea about smoking and the concept of low and slow. As the years at Tech passed I grew more indoctrinated and intoxicated with southern culture and style . It is true what they say, things just move a little slower down here and the same can be said for the cooking.

So when I finally graduated with my degree and bought my first place I knew that if I ever wanted to throw a beast party in Atlanta I needed to learn how to make great BBQ. Doing some quick research online I found that the inexpensive Brinkmann smokers found at Home Depot and Lowes make great beginner set ups. The charcoal ECB, El Cheapo Brinkmann, as it is affectionately called has an almost cult following and there are a ton of resources online for modifications that will make it perform like a $400 professional model. I considered going charcoal but I decided that I would simply get more use out of an electric model and to me this equated to more opportunities to make BBQ. So after reading a few online reviews I went ahead and got a Brinkmann Electric Gourmet. I deemed it a good compromise between ease of use, quality, and price.

As soon as I arrived home I immediately cracked open a cold one and began assembling it. The smoker was very easy to put together and took about 40 minutes including time spent wrangling kitties that were in the way. I went ahead and plugged it in without wood chips or meat for 2 hours per the instructions to ensure that all residue and paint fumes are burned off.

The next day at the Dekalb Farmers Market we purchased a beautiful Berkshire Pork butt with intentions of producing some awesome pulled pork for my first smoke. We also got some sweet corn and decided to try and make a smoked cream corn which was inspired by our favorite BBQ joint, DBA BBQ. As soon as we arrived home, I rubbed down the butt and put it in the smoker on the middle rack at about 9:30pm anticipating a 12 hour smoke time. I used Hickory chunks for flavor and placed the corn on the top rack, anticipating about a 3 hour smoke time. Unfortunately I did not think to take pictures of the butt or corn before the smoker or on it (Still a blogging newbie) so you will have to just live with a shots of the finished sandwich. I will be posting about my latest foray with chicken wings and smoked cream corn round #2 ASAP. I will also begin to compile and include recipes in the future. Stay thirsty my friends.

Home made pulled pork on a toasted bun.  A tasty treat.

Wednesday, December 14, 2011

Smelly Kitty Litter Box - Part 1

If you're like us, finding a place to keep litter boxes is always a challenge. It's no fun having an exposed litter box out in the middle of a room, so in apartments I'd always stored it in my bathroom. Which isn't so fun either... getting out of the shower and stepping on litter...yuck! So we definitely wanted to find a clever way to conceal the litter box in our new house. There's a lot of tutorials and ikea hacks out there for concealing a litter box in furniture, but we couldn't find any that would work for us.

So we came up with the idea of turning a chest into a litter box container, and then adding a cushion to the top to use a sitting area. That is, assuming it doesn't smell...


Step 1
Determine the size of the entrance hole. You can do this a few different ways- if you are going to buy one of those pet doors and install it, just cut the size specified by the company. We decided to make our own flap with vinyl and frame the hole with metal flashing or wood trim. So we used a medium sized pet door as a guide, which said the opening was 8.5" x 11.5," which we decided to round to 8.5" x 11" for simplicity. So we centered and taped down a piece of paper as a guide. If you are making a different sized hole, just measure and draw out your rectangle.

Step 2
Cutting out the entrance hole. We drilled a hole in each corner using the largest drill bit we had on hand, which was 3/16"[check]. This ended up being too small and we had to continue widening the hole enough for the jigsaw blade to fit in. Disclaimer- Always use caution (& common sense) when using power tools, and be sure to wear safety gear to avoid injury! We used a wood blade meant to cut through 3/4" wood for the jigsaw, and followed the outline of the paper. Depending on the layout of the chest and where you placed the hole, you might run into the same problem we did- the jigsaw has safety 'rails' (not sure what they are really called...) around the perimeter of the blade, so when we got towards the bottom of our hole, we didn't have enough space to cut along our line. So we had to change blades to a longer all purpose blade and very carefully balance the jigsaw on the trim of the chest. Note- I wouldn't suggest doing this, but since we'd already dug our hole.... In the future I'll pay more attention to where we place holes before starting. Live and learn.....Anyway, everything turned out for the best and we got the piece of wood out.


Step 3
Figure out what to use a litter box. We wanted to use the biggest size litter box possible for the chest (20 lb Maine Coon, remember?) So I headed over to Family Dollar and found a good sized pink storage container for $10, which fits pretty perfectly width-wise and is still a decent length to give them room to move around. It has high sides so we had to cut a rectangle out of it so they can get in (A plus to the high sides is that litter won't get kicked out quite as much). We started out using the jigsaw to make the cut, since the plastic is so thick, but bad idea! You can't really get a stable base, so the plastic was getting pulled up and down with the blade instead of cutting, so we just ended up using a knife blade (which is what Greg is using to cut with in the picture, I promise).

Step 4
Set up litter box for cats! That was all we had time for in one night, so be on the look-out for future posts to complete the litter box. We'll be adding a flap to the hole, and trim around the hole, and likely add some hanging storage for the litter box scoop, and maybe a place for some air freshner :) Then the final project will be adding a cushion to the top, for additional seating, or a place for some kitty naps :)

Overall, the cats seem happy with it. We're leaving the top open for a few days so they will explore it without feeling trapped. And since the hole we cut out doesn't have any trim yet, we covered it with duck tape for now to prevent any splinters to the cats. Check out them exploring! (which of course happened within a few seconds of setting up since they are such nosy creatures)


Psst! Check out the update to this post!

Monday, December 12, 2011

Ugly Refrigerator? No Problem!

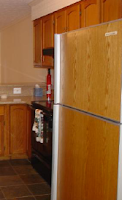
So as you can see, our refrigerator had this wooden look to it, which we didn't like. It made the whole kitchen have a cabin feel to it that just didn't work for us. We realized pretty quickly that it was just wood paneling that had been inserted into brackets on the front of the fridge and dishwasher. So what do we do about this problem?? 


CHALKBOARD PAINT!
Not having any experience with chalkboard paint, it turned out much better than I expected! The black looks great in our kitchen, especially since the oven is already black, so now all the appliances match! Chalk writes great on it, and erases easily. We've been using wet napkins to wipe it off, which gets all the chalk dust off and makes it pure black again, but a normal chalk board eraser would probably also work.

I didn't think to take any pictures during the process, but it's pretty easy to do. Since our fronts were paneling, we just pulled that out and painted them. I did 3 coats of paint to get it dark enough that the 'wood grain' didn't show through. The paint can said to use a primer, so if you did that you'd probably only have to do 1 or 2 coats, I just didn't have any on hand and didn't want to go to the store AGAIN.

The directions say to wait 24 hours before using, so make sure to do that or you'd probably end up with permanent writing or something equally bad. For the sides of the fridge, we just pulled it out far enough from the wall and painted the parts that were visible, of course making sure to lay plenty of newspaper so we didn't get paint on the tile. The paint actually adhered to the refrigerator vinyl pretty well, so it also only took 3 coats.

So far, we've just been drawing pictures on the front, but I'm thinking the side of the fridge will be great for planning out dinners, and making a running grocery list. Have you done any crafts or DIY projects with chalkboard paint?

Sunday, December 11, 2011

The Beginnings

Oh Christmas tree, oh Christmas tree.....
Yeah, I'm pretty excited about having our first tree. We have 2 cats, a 7 month old kitten and a 3 year old Maine Coon, so I'm also ecstatic that they tree is still standing after 5 days :)


Why are we starting a blog? Well, we like reading all of the other DIY blogs out there and think it will be interesting to document our own progress. And maybe we can help a few of you along the way. We bought our first home almost 2 weeks ago, and we moved in one week ago. We'll be posting more about the home on the House Tour in a few days, so check back there soon! And you can check our the About page now to learn more about us!

We've done a few simple projects so far, so we'll be blogging about them in the coming days, like painting our refridgerator with chalkboard paint, and turning our buffet into a coffee/alcohol bar. We've got some bigger projects on our to-do list, like painting the kitchen cabinets (maybe, we haven't decided yet), remodeling a bathroom, and then all kinds of outdoor projects once it gets warm again. We'll also share recipes and other activities along the way. Hope you'll join us!


LinkWithin

Related Posts Plugin for WordPress, Blogger...